


last updated on 2026-03-28
this is a beginner-friendly and safe, yet reasonably competitive route that's written exhaustively enough to hopefully allow anyone who's played the game before at least once - even if it was only casually - to finish a run on the first attempt.
if you're not familiar with the route, saving the game before bosses is advised in case something does go wrong - but if you do, you probably want to check the section about avoiding RNG manipulation.
start game in "Start" mode. timer starts at character name confirmation (choosing a name with fewer characters will save frames throughout the run)
leave city, go to Cave of Trials (there will be no encounters on the world map in this area)
complete the trials (skip second Red Jelly), return to Elcid
talk to Tia, leave town, go to Cave to Sundletan. when on the world map, you can skip encounters by opening the menu approximately every 9 steps
go all the way after bridge and get Escape
go all the way , and take the first door that leads upwards; first defeat Mushrooms with Boomerang, then Lizards with regular attacks, and proceed downstairs
hit switch, jump down, take the healing pad if necessary, proceed to the Lizard Man fight
Maxim uses Boomerang x2
by default, the battle cursor is set to memorize; that means that using the same item twice in a row can be achieved by holding Left+L at the beginning of the turn. the cursor will be memorized across battles
heal to full using Potions, then use Escape, re-enter, and proceed through cave, then to Sundletan
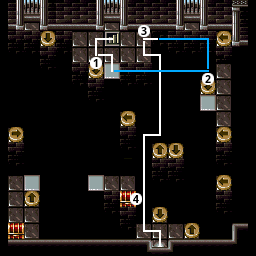
leave town, go to Lake Cave
go all the way , defeat all three enemies using Boomerangs, then enter the NE door and get the Insect Crush
Maxim Insect Crush
go back up and all the way , jump down by stepping on the lower left broken floor tile
go all the way
enter tne door on the bottom and fight through all the enemies. only use Boomerangs against two of the three Eagle encounters, prerably against double Eagles; use Insect Crush's Bomb Attack IP otherwise. collect Speedy Ring, Reset
take the right path and collect Miracle, heal to full using Potions, Reset
Maxim Speedy Ring
go to the previous room, head , push the lower right block to enter the stairs
collect the Lake Key, go back to the main room, proceed to the Big Catfish fight

Maxim uses Boomerang x4, then attack; heal with Potions when necessary
Boomerangs will deal a minimum of 47 damage - if you count the total damage you dealt and only get regular attacks from Catfish, you can decide whether to risk throwing the last Boomerang right away
cast Reset from the menu, then go back to ground level and all the way
defeat the two encounters by using a Boomerang each
Tia joins the party
leave Lake Cave, go to Alunze Kingdom
Boomerangs are in the first item slot now, which means they can be
quickly used in battle by all characters by holding Left+L
go to Alunze Castle
go to the king, and after the cutscene, go outside, , and all the way downstairs
go when possible, follow the path to the end and use a Boomerang to defeat the mandatory Mad Horse encounter, pick up Bombs, Reset
go this time, bomb through the wall, go , stand on the switch, Reset, then take the new path and proceed
bomb through wall above, proceed
go , then go , push block on left switch, walk down, Reset. enter bottom left switched teleporter, kill all three Cobalt encounters by using two Boomerangs each
proceed , use Escape after getting the Crown
go back to the king, ask for "Nothing" to get 3000 Gold
leave castle, go to Northwest Cave
fix the bridge and proceed . put pots on the three switches to proceed (the third is hidden behind the right pillar) and follow the path until you reach a dead-end. stand on the broken floor tile and fall through the floor, then proceed until Horse Rock
go until the secret path, enter it and get Light Armor, then return and go to the main room. proceed SE, go through secret path above healing tile and get Miracle, Reset, go back one room and enter the stairs
cross the water, then push the pillars in the water on the right side and get Witch Ring, then enter the stairs and go
take the secret path underneath the bridge and pick up Miracle for safety in the Regal Goblin boss fight
kill the Cobalt encounter using two Boomerangs in order to get Tia to Level 8, then go and activate the switch on this side
return to the central room, go and activate the switch there, then return to the central room and proceed to the Regal Goblin fight
Maxim Strongest
Tia Witch Ring
on the first turn, Maxim uses Fake (Ring IP) on all characters, afterwards uses Boomerang
Tia uses Strong to heal when necessary, otherwise if Regal Goblin isn't asleep, Tia casts Drowsy on it, otherwise uses Boomerang
you can watch enemy animations during action select to tell if they are asleep
even if bosses appear to be in the front row, they take reduced damage (as if they were in the back row) whenever at least one minion is in the front row
do not collect the chest after winning the battle, it's not necessary for progression
go back to the room with the pillars and the water, to the section with three chests on the right. open the chest on the far right for Power Brace, then use Escape
go to Tanbel
talk to Hilda
Maxim Remove All
Big Boomers are in the first item slot now
talk to Guy, fight Followers
Hold Left+L to use Big Boomers with everyone
Guy joins the party
go to Tanbel Southeast Tower (this is where skipping encounters on the world map becomes really important, as Guy will slow the party down, so you can't as easily run from enemies)
take the left door, proceed to the Goblin standing on a switch. kill it with Flash (Tia) and Big Boomer (Maxim)
at 4F, take the right door first to activate the switch outside, then come back and take the left door
in the room with the crabs, go first and collect the Sky Key, then come back and take the stairs up
use both healing tiles, then proceed to the clock puzzle room
push the block underneath the 12 o'clock tile, the pillar on the 12 o'clock tile (a door will appear), and finally the block on the 9 o'clock tile. enter the right door and hit the switch, then return, enter the left door and collect the Jute Helmet. finally, kill the Skeleton encounter by casting Flash and using one Big Boomer on all of them, and finishing them off with regular attacks
put Maxim and Guy in the front row
Guy Strongest
Maxim Strongest, Speedy Ring
proceed to the Camu fight
on the first turn, Tia uses Battle Lust (Shield IP) on Guy
Maxim uses Thunderblast (Weapon IP) whenever available, casts Strong if necessary, otherwise attacks
Guy attacks
Tia casts Strong if necessary, otherwise casts Flash (on Camu only)
if Slave is called, Tia casts Gale (on Slave only) and Maxim uses Big Boomer (keep at least 1)
if a character falls asleep, Tia (or whoever is available) uses Awake
same route as the first trip, except take the stairs in the room with the crabs immediately, and in the clock puzzle room, immediately push the block on the 9 o'clock position
at the top, starting with the center chest, get Camu Armor, Fire Dagger, and Pearl Brace, then use Escape, re-enter and go through the right to exit on the other side
Guy Strongest
go to the big house in the center and talk to Rochy, then exit town and go to Ruby Cave
proceed to the patch of bushes, slash them and step on the switch, proceed , again slash bushes and take the stairs
proceed to two sets of stairs, take the right one to hit the switch, go back and take the left one to get Ruby Key, then go back and take the right set of stairs once more
build an ice bridge to the stairs , use the healing tiles, then proceed to the Tarantula fight
on the first turn, Maxim casts Fake (Ring IP), and Tia uses Battle Lust (Shield IP) on Guy
Maxim uses Hi-Potion or casts Strong when necessary, and otherwise uses Big Boomer
Guy uses Blaze Attack (Weapon IP) whenever possible, and otherwise attacks
Tia casts Strong or uses Mystery Pin if necessary
go into the room above and talk to Jaffy, then use Escape and use Warp to Clamento, talk to Rochy
leave town, go to Parcelyte
exit town, enter castle, and after cutscene, talk to the king
Selan joins the party
proceed to Treasure Sword Shrine
take right door and take stairs to platform puzzle
move lower horizontal platform left, get Undead Ring, then move the platform left again, then move each adjacent platform until you're at the top right.
move the right vertical platform up, get Cold Rapier, move it up again, then move each adjacent platform until you're at the top right
move the lower horizontal platform and each adjacent platform to get Anger Brace and Sword Key, cast Escape and re-enter
take center door and proceed to the lever room, where you want to go . go onward to the room with a set of stairs, where you want to get Mind Ring. then, take the stairs


Maxim Strongest
Tia Mind Ring, Pearl Brace
Selan Mini Shield
take both healing tiles, then proceed to the boss
Maxim uses Battle Lust (Shield IP) on himself once, then uses Glacial Blast (Weapon IP) if available, otherwise attacks
Guy attacks, Tia casts Gale, Selan casts Strong
Guy attacks
Maxim uses Battle Lust (Shield IP) on Guy once, then casts Flash
Tia casts Flash, Selan casts Strong
after fighting both bosses as a full party, the party will split up and you'll have to fight them again with two characters each
Maxim uses Battle Lust on himself on the first turn, then uses Glacial Blast if possible, otherwise attacks
Tia casts Stronger (Ring IP) or otherwise Strong on both every turn.
Guy uses Hi-Potion/Regain on Selan in the first turn, then Blaze Attack (weapon IP) if possible, otherwise attacks
Selan uses Battle Lust on Guy on the first turn, then casts Strong on both every turn
get the Treas. Sword
Guy Remove All
cast Escape and talk to the king in Parcelyte. then go to Gordovan, enter and leave the town, and proceed to Gordovan West Tower
go twice, proceed until the lever, activate it and follow the path outside until a room with a set of stairs; take the stairs
place pot on right switch and enter the corresponding door. follow the path and get the Hook, then proceed until a set of stairs and take them
go , bomb the crate, take the path and hit the lever outside, then return to the crate room and take the door to the elevator. take the elevator to the 3rd floor and take the left door


hit switches in this order: 1, 5, 6, 2, 7, 3, 4
get Wind Key, then take the elevator to 5th floor
go , then through key door, then proceed to Gades fight
hold Down+L to escape until your party is wiped
go and get Scimitar and Block Shield from the chests
cast Escape, Warp to Parcelyte, talk to the king
Guy leaves the party
exit the castle, cast Warp to Gordovan, then proceed through Gordovan West Tower (right door) to Merix
head to Cave Bridge
go thrice (the last door is a bombable wall), flip the switch, then hookshot over the river
take left door and proceed to the big room. use 2 Big Boomer and a Flash cast from Selan to defeat the enemy right in front of the orb, then slash the orb and proceed to the exit and go to Bound Kingdom
talk to Dekar and the king, exit the castle, go to North Dungeon
go and get Thunder Ring, then Reset and leave to main hall
go , follow path until platform puzzle, move the platforms to go

proceed over bridge puzzle (placing bombs as indicated will allow you to move over the bridge while the animation runs)


Tia Remove All
Selan Pearl Brace, Mind Ring
Maxim uses Big Boomer, Tia casts Strong on everyone, Selan casts Fireball on 3 Mummies
on the second turn, Tia and Maxim cast Strong to heal, Selan casts Fireball on the final Mummy
on the first turn, Maxim uses Big Boomer, Tia uses Regain on Selan, Selan casts Fireball on 2 Trolls
on the second turn, Selan casts Fireball
Maxim and Tia defend if Selan has full HP, otherwise they use Regain on Selan
Selan Thunder Ring
cast Escape, cast Warp to Bound Kingdom, talk to the king
Tia and Selan leave the party
Guy and Dekar join the party
put Dekar and Guy in the front row
exit castle, go to Ancient Tower
push pillar into wall and follow path until room with Earth Vipers and Bruses; kill both by everyone using Big Boomers
go , follow path until bombable wall, continue through there and follow the path
go at the fork and enter the teleporter from the right/facing left
go , take the ladder up, then enter the left door
kill Earth Vipers and Snells by everyone using Big Boomers, proceed to get Cloud Key
bomb the wall and get a Miracle for safety in the Gades boss fight
return outside and take the right door, proceed to the switch and press it, then go back outside and down the latter, and back to the teleporter room; enter the center teleporter from the left/facing right this time
take door, get Fayza Shield, then return to previous room
proceed to the switch and activate it, press the second floor switch, then follow the path and finally take the ladder on the left when outside, then follow the path
hit the left statue 5 times, the right statue 3 times, then step on the tile between them to get access to a set of healing tiles
take door, follow the path until a room with a Deadly Armor, go and step on the right teleporter, hold right and hope to win the race; otherwise retry. proceed to hit the switch, then go and proceed to Gades fight
Maxim Fayza Shield, Mind Ring
Guy Strongest, Speedy Ring
Dekar Undead Ring
Guy uses Battle Lust (Shield IP) on Dekar, then on himself, then uses Holy Energy (Weapon IP) or attacks
Dekar attacks
Maxim casts Stronger (Ring IP) or Strong on himself and one other character
go , bomb statue, return to pillar room
go , then , hit the statue with an arrow, return to the pillar room
go and proceed to the end, step on the platform
Guy and Dekar leave the party
Selan joins the party
go to North Lighthouse
take arrow door, then door, enter stairs, go

go to stairs, proceed to switch and press it, then return to memory puzzle room, go and follow path until pillar room
head across and take door, proceed to the switch (bomb a wall), then return to the pillar room
take door, solve puzzle and collect Light Key, cast Escape

take arrow door, proceed until fork, take the door, take the first stairs up
bomb through floor on the right and push the pillar down and on the switch to get Bee Rock. then hookshot over to the other side, go to get back upstairs
Selan Bee Rock
on the first turn, Selan casts Trick on everyone
Maxim uses Glacial Blast (Weapon IP) or attacks
Selan cast Strong
if Idura calls a companion, either Selan casts Bolt (Ring IP) on companion, or both Maxim and Selan cast Flash on companion
warp to Bound Kingdom, proceed to Aleyn
Guy and Dekar join the party
put Guy and Dekar in the front row
Ice Balls are in the first item slot now
leave town, go to Phantom Tree Mountain
go (bomb the bushes), hit switch, go back to the bushes and go
in the bush puzzle room, go , get Tree Key, then return to bush puzzle room
go , get Fire Arrow, proceed through hidden path behind vines, proceed to Lion fight
on the first turn, Selan uses Immobilize (Rock IP), should paralyze at least one Lion
with two paralyzed Lions (check their animation), use Ice Balls with everyone until the end of the battle
with one non-paralyzed Lion, Guy uses Ice Ball on it, Maxim casts Stronger (Ring IP) on himself and Selan, and Selan casts Blizzard targetting all Lions
with two non-paralyzed Lions, Selan also casts Stronger
go outside and to the Phantom Tree
sleep twice at the Inn
go to the port and talk to Jyad; choose to go to Gruberik
Sleep Balls are in the third item slot now
put Guy and Dekar in the front row
go to the port and talk to Jyad; choose to go to Narcyssus
trigger cutscene, then exit town and go to Tower of Sacrifice
proceed to room with Samurai, bomb through the top wall, get Narcysus Key and Ice Ring, return to Samurai room and proceed
in bomb arrow room, clear left then right arrow, then go , hit the switch, then return and go to proceed to Idura fight
Selan Ice Ring, remove Bee Rock
Maxim Speedy Ring, Bee Rock
Guy Thunder Ring
Maxim uses Fleet (Shield IP) on himself once, then uses Sleep Ball, otherwise defends
Guy and Dekar use Ice Balls
Selan casts Blizzard
if Idura calls a companion, Dekar attacks it, and Selan casts Fireball on it
cast Escape, walk over bridge, then past Karlloon to Karlloon North Shrine
follow path until fork, go , hit the bottom and then the top switch, get Dekar Blade, use Reset
return to fork, hit switch, and proceed until push-block puzzle, get Lion Fang from the chest in that room
Dekar Dekar Blade, Lion Fang
proceed to Idura fight
on the first turn, Guy uses Battle Lust (Shield IP) on Dekar, Maxim uses Fleet (Shield IP) on himself, Dekar uses Fatal Blow (Weapon IP)
Dekar attacks
Guy uses Ice Balls
Maxim, then uses Sleep Ball if enemy isn't asleep, otherwise defends
Selan casts Blizzard
if Idura calls a companion, Selan casts Blizzard on it, Dekar attacks it
Dekar Remove All
go and talk to Iris, go and hookshot-fall into hole, bomb three pillars and go , then go
Dekar leaves the party
exit town and go to Shrine to Treadool, then to Treadool
talk to the blue-haired guy in the town center, choose "Yes" (default option), exit town after cutscene and go to Shaia Laboratory
take right, left, and right (hidden behind vines) paths, talk to Lexis
go back upstairs, cast Escape, cast Warp to Aleyn
talk to Jyad in the bottom center house, then cast Warp to Treadool
talk to Leefa, then exit town and go to Flower Mountain
get Hammer, then proceed to the room with white pushable blocks around a hammerable block. go and jump down the cliff to , enter and take the path around instead of the door hidden behind vines

take the stairs up twice, use the healing tile, then drop down the cracked floor tile hidden by a bush on the top right; get Burn Sword, go and get Flower Key, then jump down the cliff to
proceed once again to the hammerable rock and pass it, then go to Rogue Flower fight
Guy Burn Sword, Lion Fang
Selan Mini Shield
on the first and second turn, Selan uses Battle Lust (Shield IP) or Trick on Guy
Guy attacks
Maxim uses Sleep Ball if enemy isn't asleep, otherwise defends
Selan defends
get the flower, cast Escape, cast Warp to Treadool and talk to Leefa, then go to the pier to talk to Lexis
Lexis joins the party
go to Dankirk Kingdom (when travelling by ship, encounters can still happen, but they're much further spaced out than on land)
go to the upper left tower and talk to the prince, attempt to leave the castle to trigger a cutscene, then actually leave and cast Warp to Clamento, talk to Jaffy (lower left house), then cast Warp to Dankirk and talk to the Prince. finally, exit the castle and go to Dankirk North Cave
proceed to hub room and go , proceed to the end to trigger the switch, Reset, return to hub room
hit the switch and go , proceed to the end and activate the switch, bomb through wall on the top, step on switch, then take the stairs
go in hub room, proceed to chest and get Fury Ribbon
in eyes room, shoot both eyes, then take the stairs; step on the teleporter and push block on each of the switches, followed by stepping on the raised tile on the floor below. get Dankirk Key, then go back upstairs, push the block to the center, and hit the switch
back in the eyes room, hit last eye, then hit switch and return to spikes room. there, hit the last switch if you haven't on the way there, and proceed past the lowered spikes
in Asashin room, cut bush and open the middle chest to get Figgoru, then Reset and proceed
Guy remove Lion Fang
Lexis Figgoru, Undead Ring, Lion Fang
also equip Bee Rock to Maxim or Selan, depending on who has enough IP (51%)
put Guy and Lexis in the front row
get a first strike for Shadow fight and hold L, then go to the grate, pick it up and fall, hit switch and take stairs, then proceed to Soldiers fight (Asashins die quickly to a Lexis attack, but avoid Dragonians; if there are any Shadow battles, try to get a first strike and hold L)
on the first turn, Maxim or Selan use Immobilize (Rock IP) once
Guy uses Firestorm (Weapon IP) or attacks
Selan uses Blizzard on all targets
Lexis attacks
Maxim defends
leave castle and take the ship to Auralio Kingdom. talk to the king, then take the ship through the watergate to Ferim Kingdom
go to the castle roof, enter the lower right door, then talk to Hans in the top right room. exit the castle and go to Northeast Tower
in the second room, hammer wall on the right and proceed to next fork: hammer pillar to the left and go outside, then take the left door, shift the platform to the right, then enter right door

proceed to get the Trial Key, cast Escape and re-enter
take the same path as before, but instead of shifting the bridge to the right, cross it and proceed
slash the arrow before entering the platform, then slash the next arrow. step off the platform, open and close the menu, proceed out of bounds and get Mysto Jewel
proceed to the end and talk to Hans
cast Escape, cast Warp to Ferim and talk to the king, then leave the castle and go to Agurio. talk to Iris, then exit town and cast Warp to Ferim and take the ship to Treble.
go to Portravia
enter Kirmo's Lab in the center, go downstairs and talk to Dr. Kirmo. answer "Yes" (default option). leave town, and take take ship to Mountain of No Return
Lexis Remove All
Selan Mysto Jewel
Maxim Lion Fang
Lexis Bee Rock

proceed to the Gargoyles fight by going , through the big room
everyone uses Terror Balls
whether Lexis survives doesn't matter; heal/revive everyone else with Selan or Lexis if necessary
Lexis leaves the party
Arty joins the party
put Guy and Arty in the front row
Arty Remove All
exit town and go to Divine Shrine
in large room, use the hookshot to go , until switch, which you hit and then enter the set of stairs to get the Heart Key, use Escape, then return to the starting platform in the big room
go , , push the pillar up, then take the left path of the fork and enter the set of stairs on this side. unburden the top left switch and proceed to get the Rocket Ring. then return to the starting platform
go to the pot room again, but this time fall down the hole at the lower right pot section, then follow the path and ignore the bombable wall, proceed and stand on stat boost pad
cast Escape, cast Warp to Portravia
talk to Lexis in Kirmo's Laboratory, then take the submarine to underwater entrance of Shrine of Vengeance (when submerged, you'll move at the same speed as when above water, but you won't get any encounters, so there's no need to periodically enter the menu)
go , take first set of stairs and get Ghost Key, then go back upstairs and keep following the path, bombing the last bombable wall
when standing before the large chasm, go and get Evil Jewel, then return and go
Maxim Evil Jewel
Selan Undead Ring, remove Mysto Jewel
Guy Tough Hide, Lion Fang
Arty Strongest, Rocket Ring, Mysto Jewel
use the healing pads, then proceed to Venge Ghost fight
on the first turn, switch Arty with Selan
Guy and Maxim use Re-Energize (Armor IP)
Selan uses Sacred Song (Armor IP)
Arty casts Valor on Venge Ghost
if necessary, heal with Arty
go and get Cursed Bow, take the healing tiles again if necessary, cast Escape, then go to Barnan
talk to Iris, then exit town and take submarine to Chaed
Dragon Tooths are in the first item slot now
exit town and take submarine to Tower of Truth
take door on the right, step on the right button, and step on the note tiles in the order 3-2-1-4, then proceed to hit the switch, circle around, hammer the wall and proceed N
after the stairs, go (watch out for the non-default-moving Siren)
outside, take two ladders and enter the door. step the right button, and step on the note tiles in the next room in the order 4-2-5-1-3
in pots and crate room, place the right pot on the right switch and the crate on the top left switch, then proceed
on the next floor, go and get the two rightmost chests for Ghost Ring and Ghostclothes, then go and proceed
in the bridge puzzle room, first place jar and crate on the two buttons to the left, go left and push block down, then return. put the pot on the lower right button, the box on the center button, go left and push the block up, then return. take the crate and put it on the lower left button, place a bomb next to it, walk down
get Truth Key, then return to pots and crate room and proceed and outside, go , proceed to White Dragon fight
before the first turn, switch Maxim with Guy
use Dragon Tooth with Maxim and Arty, then hold L to attack with the others
Escape, then take the submarine to Durale
exit town and cast Warp to Chaed, go to Dragon Mountain
take first set of stairs on the right and enter the door above

go and get Sonic Ring, hookshot across and take stairs
go and take stairs, hookshot across and make the enemy step on the broken floor, then proceed
in broken floor room, first head , get Magma Key, then cast Escape and re-enter
take both sets of stairs and enter the last door, proceed through key door
in pillar room, use hammer and hookshot on the lower right pillar, then on the top right one, and finally on the other bottom right one to hookshot across and proceed


on the broken wall, place a bomb, hit the wall six times with the hookshot, then once with the hammer
complete TWMDT and get Lizard Blow, Legend Helm, and Holy Robe

proceed to lava room, go and proceed to Fire Dragon fight
put Guy (left position) and Maxim (right position) in the front row
(putting characters in specific positions within rows has to do with a bug that allows you to have characters take less damage in certain situations)
Selan Strongest
Arty Strongest
Guy Strongest
Maxim Jute Helmet
on the first turn, Arty uses Battle Lust (Shield IP) on Guy
Guy uses Dragon Rush (Weapon IP) or attacks
Maxim uses Glacial Blast (Weapon IP) or attacks
Selan uses uses Dragon Tooth
Arty casts Champion or Valor as needed
cast Escape, cast Warp to Chaed and talk to old man to get the Jade of Mermaids. exit town and take the submarine to Chaed North Submarine Cave and Preamarl
put Guy and Selan in the front row
Guy Tough Hide, Ghost Ring
Selan Evening Gown
Maxim Strongest, Sonic Ring
Arty Strongest, Thunder Ring
talk to the queen, then exit town and go to Submarine Cave to Shrine
Guy and Maxim use Re-energize
Selan uses Sacred Song
Arty casts Valor on Ghost Ship
enter the lower left whirlpool, proceed to the end and talk to the queen
in glitched shrine room, walk up until blocked, then take three steps to the right, walk up until blocked, take three steps to the left, and proceed up
exit Chaed, cast Warp to Portravia
talk to Lexis, leave town, cast Warp to Durale, take submarine to Gratze Submarine Cave. go straight to find the correct exit
put Selan (left position) and Arty (right position) in the front row
Arty Ghostclothes, Thunder Ring, remove Fury Ribbon, remove Mysto Jewel
Guy Camu Armor, Rocket Ring
Selan Strongest, Ice Ring, Mysto Jewel
use the healing tiles, then proceed to Soldiers fight
use Dragon Tooth with Selan and Arty, then hold L to attack with the others
go in Squid room, then again in Gold Gorem room, then and get the Basement Key by going out of bounds, then use Reset

push pillar on button, hookshot over, flip the switch, hookshot back and proceed past Gold Gorem
in triple enemy room, go
proceed to Soldier and Tank fights
use Dragon Tooth with Selan and Arty, then hold L to attack with the others
on the first turn, put Guy (left position) and Maxim (right position) in the front row; Selan casts Trick on everyone
Maxim uses Holy Energy (Weapon IP) or attacks
Guy uses Dragon Rush (Weapon IP), otherwise attacks
Arty casts Valor if someone's dead, otherwise attacks
Selan casts Champion to heal when necessary, otherwise attacks
if Tank uses Missile Blast, switch Maxim and Arty, then switch back after the attack that follows Missile Blast
go to Lexis, then take the airship to Narvick
put Guy (left position) and Arty (right position) in the front row
Guy Undead Ring
Selan Crystal Wand, Power Brace, remove Mysto Jewel
Arty Crystal Wand, Rocket Ring, Mysto Jewel, remove Thunder Ring
Selan Thunder Ring
talk to elder and pick up Lisa, then head to Shuman Tower
take the stairs and then the last door on the left, then when back outside, the door on the right; defeat Leech encounter with attacks from everyone
take the door on the left, and in the Dragon encounter, switch Guy to the back row and then defeat it with everyone using Dragon Tooth
on the first turn, Maxim or Guy uses Berserker (Shield IP)
on the second turn, put Maxim (right position) in the front row
Selan uses Holy Energy (Weapon IP) or attacks
Arty heals or attacks
Guy and Maxim attack
you receive Pearl Armor in the cutscene (items you get in the tower cutscenes are named different than their menu names)
Maxim Strongest
heal everyone via spells with Arty/Selan
take the airship back to Narvick, talk to elder and pick up Marie, then head to Strahda Tower
go left and take the stairs, then go right and take the stairs upwards again; defeat the Leech encounter with regular attacks (prioritize Leeches)
go right and follow the set of stairs until a door on the top left, enter it, and in the Dragon encounter, switch Guy to the back row and then defeat it with everyone using Dragon Tooth
on the first turn, switch Guy with Selan, Maxim and Guy use Berserker (Shield IP)
on the second turn, switch Selan with Guy and Arty with Maxim
Guy attacks
Maxim uses Holy Energy (Weapon IP) or attacks
Selan uses Holy Energy (Weapon IP) from the back row or attacks
Arty heals, uses Holy Energy (Weapon IP) or attacks
you receive Pearl Helmet in the cutscene
cast Escape, talk to elder and pick up Clare, then head to Kamirno Tower
enter right door, progress up the stairs outside and head down, go up when possible, enter door and defeat Gorgon encounter with everyone using Dragon Tooth
after passing the Sphinx, go left and defeat Leech encounter with regular attacks from everyone
you receive Dual Blade and Pearl Shield in the cutscene
after the cutscene, talk to Lexis
for the next couple of boss battles, just proceed forward to get to the next encounter. make sure to heal after each encounter, and don't worry about IP, as you'll have full IP at the start of each of the battles
on the first turn, Guy uses Dragon Rush (Weapon IP)
Arty and Selan use Holy Energy (Weapon IP)
Maxim uses Berserker (Shield IP)
on the second turn, switch Arty with Maxim
Maxim uses Holy Energy (Weapon IP)
Arty and Selan use Holy Energy (Weapon IP) or attack
Guy attacks
on the first turn, switch Guy with Selan
Guy and Maxim use Berserker (Shield IP)
Arty and Selan use Holy Energy (Weapon IP)
on the second turn, switch Selan with Guy and Arty with Maxim
Guy uses Dragon Rush (Weapon IP) or attacks
Maxim and Selan use Holy Energy (Weapon IP) or attack
Arty casts Champion
Arty Ghost Ring
Maxim Rocket Ring
Selan Sonic Ring
on the first turn, switch Guy with Selan
Arty and Selan use Holy Energy (Weapon IP)
Guy and Maxim use Berserker (Shield IP)
on the second turn, switch Selan with Guy and Arty with Maxim
Guy uses Dragon Rush (Weapon IP)
Maxim uses Holy Energy (Weapon IP)
Arty attacks
Selan casts Champion
on the third turn,
Guy attacks
Maxim and Selan use Holy Energy (Weapon IP)
Arty casts Champion
on the fourth turn, switch Guy with Arty
Arty uses Holy Energy (Weapon IP)
Maxim, Selan and Guy attack
Arty Speedy Ring
Maxim Anger Brace
Selan Silver Robe, Thunder Ring
on the first turn,
Guy uses Berserker (Shield IP)
Arty uses Fake (Ring IP) on everyone
Maxim uses Battle Lust (Shield IP) on himself
Selan uses Revival Sleep (Armor IP)
on the second turn, switch Arty with Maxim
Guy uses Dragon Rush (Weapon IP)
Maxim and Arty use Holy Energy (Weapon IP)
Selan casts Champion
on the third turn, switch Guy with Selan
Guy attacks
Maxim and Selan use Holy Energy (Weapon IP) or attack
Arty casts Champion
on the fourth turn, switch Selan with Arty
Selan casts Champion
Guy attacks
Maxim and Arty use Holy Energy (Weapon IP) or attack
on the fifth turn, hold L
on the sixth turn
Guy attacks
Maxim, Selan, and Arty use Holy Energy (Weapon IP) or attack
go , towards the first Mystic Stone, then circle around it to the door
go , towards the second Mystic Stone, then go around the right to the door
go clockwise all the way around the room towards the third Mystic Stone
timer stops when the third Mystic Stone is broken - congratulations!
runs with this route can be submitted to the Any% NMG NoManip leaderboard, which is also where the current rules can be found.
it is compatible with runs on the Any% NMG (US) leaderboard
best practice to avoid unintentional RNG manipulation requires four empty save files. start a new game in any mode, advance the RNG to an unknown state (for example by waiting a few minutes in a town with moving NPCs), then soft-reset the game by pressing L+R+Start+Select, which carries over the unknown RNG state to a new run. now you only need to avoid saving the game during your run
this method is not currently explicitly enforced by src rules, so you - like many other runs on the leaderboard - will likely get away with either having or creating/loading save files simply by not actively trying to manipulate the RNG
unfortunately, it's not possible to both follow the best practice as well as save before bosses as a safety measure. the only somewhat practical approach is to save-state before a boss, which in case of a game over allows you to load the save state, which won't allow you to submit the run, but at least to finish it
this guide has been created by RealCritical,
originally based on a route created in tandem with Derxu and Skipsy,
most recently adapted multiple route changes suggested by Clanne
also thanks to everyone providing minor or major input to help the run along!